-
Jayesh Limaye
27th Jul 2012
Windows 8 is just around the corner and Microsoft has provided an opportunity for interested users, to take a look at what the new desktop OS has got to offer. While it brings a radically new design that can only rival its transition from Windows 3.1 to Windows 95, the change has not exactly been well received from all corners. The new Metro UI appears good for touchscreen portable devices such as tablets and mobile phones, but bringing it to a desktop OS still appears far-fetched. A major difference is the lack of a Start Button with the Start Menu, which may make navigation a little difficult for those who wish to go for the transition. However, there is a way to get the classic Start Menu back in this new OS, and we are going to show you just how.
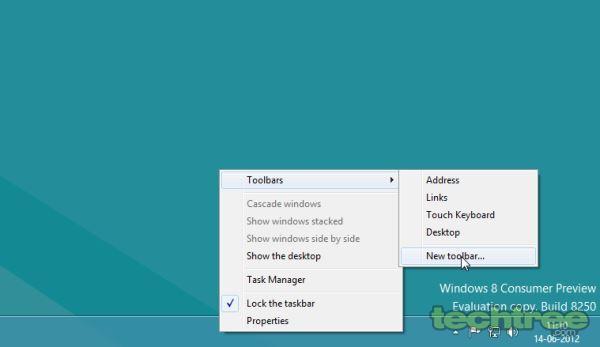
To achieve our goal, we are going to make use of certain features from Windows 7, retained in Windows 8 for backward compatibility. One of these features is the Toolbar. Switch to the Desktop mode and right-click on an empty area on the Taskbar. Move your mouse cursor over Toolbars and select New Toolbar… option.
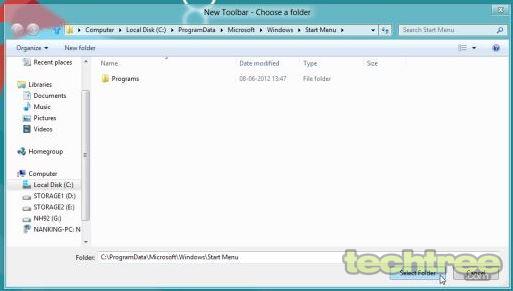
In the New Toolbar - Choose a Folder dialog box that appears, type the path of the classic Start Menu as mentioned below:C:\ProgramData\Microsoft\Windows\Start Menu
You can replace C: with the letter of the drive where your OS is installed.
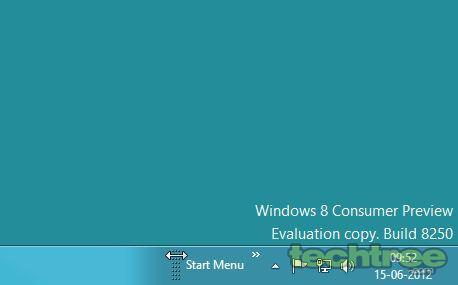
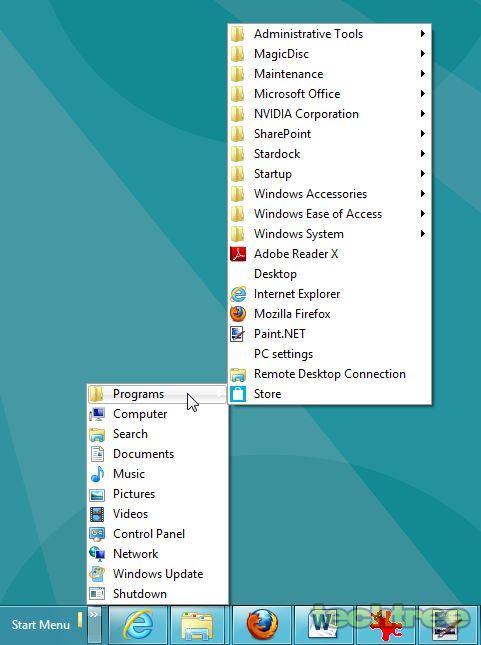
Click on Select Folder button and you will see the Start Menu toolbar appear on the right of the Taskbar, just before the Notification Area.
While the Start Menu we just created will contain only Programs menu and Windows Update, we need to add a few more shortcuts to make it as usable as in the previous OS. This can be achieved by creating shortcuts of the required options, and moving them to the aforementioned folder location. We will enumerate the method of creating shortcuts to Documents, Control Panel, Search, and Shut Down.
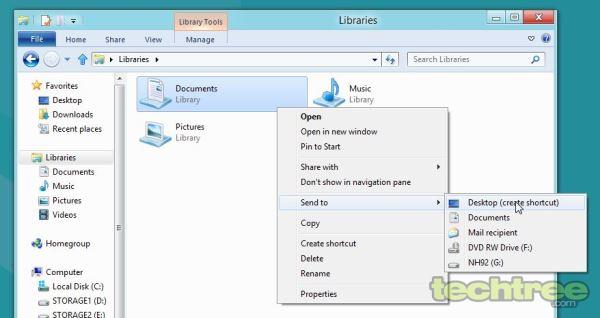
To create a shortcut to Documents: Launch Windows Explorer. Right-click on Documents and click on Send To > Desktop (Create Shortcut). Repeat the procedure for Pictures, Music, and Videos, if you want to put them on the Start Menu.
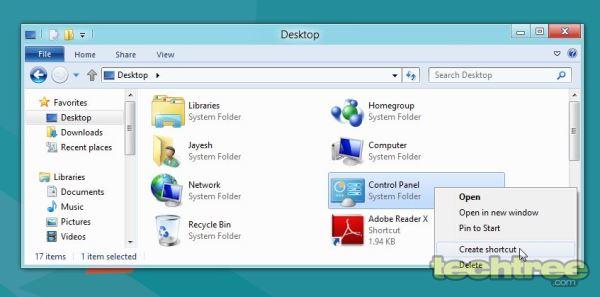
To create a shortcut to the Control Panel: Launch Windows Explorer and select Desktop, located just below Favorites in the left pane. Right-click on Control Panel icon located in the right pane and click on Create Shortcut to create a shortcut on the Desktop. Repeat this procedure to create shortcuts for Computer and Network, if you wish.
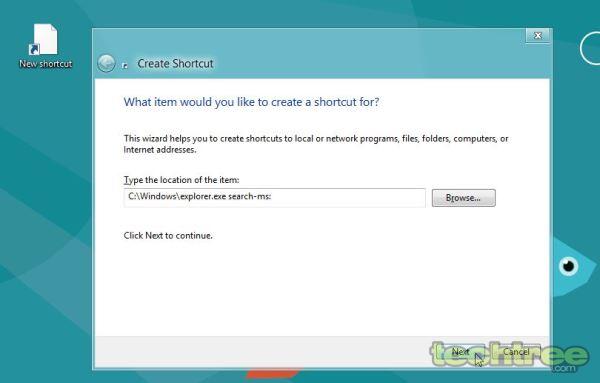
To create a shortcut for Search: Right-click on an empty spot on the Desktop and select New > Shortcut. Type the following command in the Location text box of the Create Shortcut dialog box:
C:\Windows\explorer.exe search-ms:
Click on Next and save the shortcut after naming it as Search.
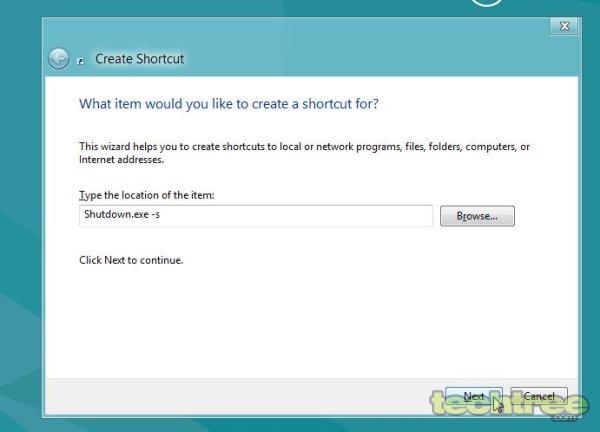
To create a shortcut to Shut Down: Right-click on an empty spot on the Desktop and select New > Shortcut. Type the following command in the Location text box of the Create Shortcut dialog box:
Shutdown.exe -s
Click on Next and save the shortcut after naming it Shut Down.
Now that you have created all the shortcuts you require, you will notice that there is the word "shortcut" appended to each of the file names. Rename individual shortcuts to remove it.
Next, start Windows Explorer and navigate to the Start Menu folder mentioned at the start of this article. Move all the newly created shortcuts to this location. You will see a Destination Folder Access Denied dialog box because this is a system folder. Select the Do this for all current items check box and click the Continue button.
Now that you have recreated the Start Menu, you must move it to its rightful position, which is the extreme left of the Taskbar, where the Start button used to exist. To do this, right-click on the Taskbar and select Lock. The Taskbar to remove the check mark against it. Slowly move the mouse cursor to the left of the letter "S" in "Start Menu", when you will notice that the arrow shape changes to a double-headed arrow. Left-click at this point and drag towards the left corner. Make sure that you drag it a little above or below the icons already present on the Taskbar to be able to jump over them. Once in position, right-click on the Taskbar and select Lock The Taskbar to put a check mark against it, and to make it immovable. Congratulations, you have just created your own Start Menu in Windows 8!
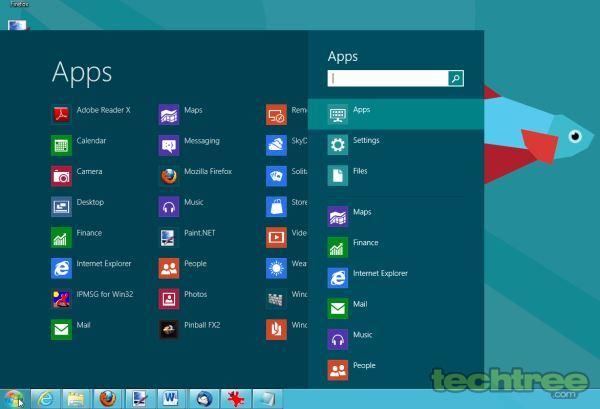
For those of you who are looking at more cosmetic changes, you can make use of the Start8 utility by Stardock (famous for its WindowBlind application). This GUI tweak actually creates the Start Button orb on the Taskbar. However, the Start Menu is not created in this method. Instead, on clicking the orb, a pint-sized version of the Apps section of the Start screen appears, similar to the Metro UI way. You can choose either of the above methods, although we think that the first one is more functional as well as fulfilling.
Guide: How To Bring Back The Start Menu To Windows 8 | TechTree.com
Guide: How To Bring Back The Start Menu To Windows 8
For those who don't like radical design changes to Microsoft's new OS, here's a way to bring back a familiar feature.
News Corner
- DRIFE Begins Operations in Namma Bengaluru
- Sevenaire launches ‘NEPTUNE’ – 24W Portable Speaker with RGB LED Lights
- Inbase launches ‘Urban Q1 Pro’ TWS Earbuds with Smart Touch control in India
- Airtel announces Rs 6000 cashback on purchase of smartphones from leading brands
- 78% of Indians are saving to spend during the festive season and 72% will splurge on gadgets & electronics
- 5 Tips For Buying A TV This Festive Season
- Facebook launches its largest creator education program in India
- 5 educational tech toys for young and aspiring engineers
- Mid-range smartphones emerge as customer favourites this festive season, reveals Amazon survey
- COLORFUL Launches Onebot M24A1 AIO PC for Professionals



Reader Comments (4)